 Forwarding Handler
Overview
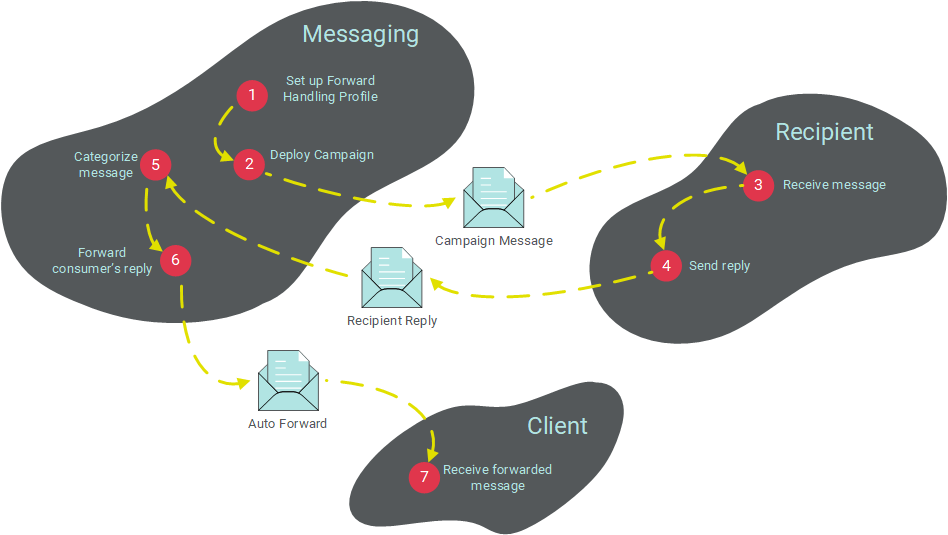
In some cases, recipients of an email message from an email marketing campaign may attempt to respond to that message. The platform can be configured to automatically forward the consumer's reply (in plain text format, without any images or attachments), along with a standard message and subject, to a specified person or group. For example, you could forward all consumer replies to a sales team, or a customer service representative, for follow-up.
Upon receipt of a reply from a consumer, the Engage+ email server will analyze the message and group it first by Client, then by Campaign, and then by Reply Category. Reply Categories represent the type of reply message based on the presence of certain keywords. For example, the acronym "OOTO" (for "Out of the Office" is often used in automated email replies when someone is going to be on vacation. If the platform finds "OOTO" in the consumer's reply message, it will categorize that email message as a "Probable Auto-Response."
By default, only the "Unknown" and "Response" Reply Categories are acted upon by the platform's Forwarding Handler. You can choose to set which Reply Categories you want to act on, and which ones you want to ignore. Setting the Reply Categories is an Administrator-level function so please speak with your Client Services Representative if you'd like to modify which Reply Categories you automatically forward.
The details of how the system handles these forwarded messages are organized into a "profile." This profile contains the list of individuals who should receive the forwarded message, the content and subject line of the forwarded message, and the "From" email address that should be used. The Forwarding Handler screen lets you define and manage your Forwarding profiles.
Response Forwarding can be used in conjunction with (or instead of) Auto-Replies. Auto-Replies will automatically send a message back to the consumer. For more information on Auto-Replies, please see the Auto-Reply Handler topic.
The following diagram depicts this process of using Response Forwarding.
Access
The Forwarding Handler screen is accessible by the following method:
Features
|
Click hereClick here
To create a new Forwarding Handler profile:
-
Above the list of existing Forwarding Handler Profiles, click the New Item button. The Workspace is refreshed to show a blank Forwarding Handler profile screen.
-
In the "Profile Name" field, enter a name for your new Forwarding Handler profile.
-
The "From Address" field is used to indicate from whom the forwarded message will appear to have been sent. Provide a "From Address" using one of the following methods:
-
Click the "Manual" tab, then enter an email address.
-
Click the "Data Field" tab. The Data Field drop-down menu is populated with every field in your system that's formatted with a Data Type of "Email." From this drop-down menu, select a field / table.
-
The "To Address" field is used to indicate to whom the forwarded message should be sent. Provide a "To Address" using one of the following methods:
-
Click the "Manual" tab, then enter an email address.
-
Click the "Data Field" tab. The Data Field drop-down menu is populated with every field in your system that's formatted with a Data Type of "Email." The table where the field resides is displayed in brackets. For example: "email [Recipient]."From this drop-down menu, select a field / table. Please note that the field you select here must reside on the source table for the Campaign where you intend to use this Forward Handler.
-
In the "Subject" line, enter the forwarded email subject line.
-
In the "Message" text box, enter the forwarded message (this message will appear in the forwarded email, along with the original reply from the consumer).
Note: Forwarded emails do not support the use of Dynamic Content or Personalization.
-
When finished, click save.
|
|
Click hereClick here
To view or edit an existing Forwarding Handler profile:
-
When the screen is displayed, a list of all the current Forwarding Handler profiles is displayed in the left-hand side of the Workspace. Optionally, you can filter this list by typing in all or part of the profile name in the "Search by Name" field.
-
Click on the profile that you want to view. The Workspace is refreshed to show the details of the selected Forwarding Handler profile.
-
Make any necessary changes to the Forwarding Handler profile:
-
Enter a new profile name.
-
Change the "From" email address by using one of the following methods:
-
Click the "Manual" tab, then enter an email address.
-
Click the "Data Field" tab. The Data Field drop-down menu is populated with every field in your system that's formatted with a Data Type of "Email." From this drop-down menu, select a field / table.
-
Change the "To" email address by using one of the following methods:
-
Click the "Manual" tab, then enter an email address.
-
Click the "Data Field" tab. The Data Field drop-down menu is populated with every field in your system that's formatted with a Data Type of "Email." From this drop-down menu, select a field / table.
-
Change the forwarded email subject line.
-
Change the forwarded email message (this message will appear in the forwarded email, along with the original reply from the consumer).
-
To save your changes, click save.
|
|
Click hereClick here
Email Campaigns can optionally be assigned an Auto-Reply Handler profile, a Forwarding Handler profile, or both.
To assign a Forwarding Handler profile to a Campaign:
-
Navigate to the desired Campaign (see Campaigns for more details).
-
Click the "Setup" tab.
-
In the "Envelope" section, select "Add Reply Handlers" from the "Advanced Options" menu. The system adds a new "Reply Handlers" section to the screen.
-
From the "Forwarding" drop-down menu, select the desired Forwarding Handler profile.
|