 Permission Management: Sender Profiles
Overview
Sender Profiles, along with Preferences, allow you to manage which recipients in your database are eligible to be contacted in your Campaigns.
Within Messaging, the Sender Profile serves as the broadest level for maintaining the permissions status of your customers. A Sender Profile is used to control the "from" information from which your message is sent. Messaging allows you to have different Sender Profiles within your client account, so you can manage your sender reputation at a more granular level. By setting up different Sender Profiles, you can process opt-outs, abuse complaints, and bounce removals separately. This feature is particularly useful when deploying messages for different brands or programs types, such as promotional messages versus operational messages (i.e., order confirmations or shipping notifications).
Channels
Sender Profiles are used for Campaigns in the SMS Text, Push Notification, Email, and LINE channels.
Note: Due to the complexities involved in defining a new Sender Profile, you're not able to create Sender Profiles directly from the Messaging user interface. If you need to create a Sender Profile, please work with your Messaging support team, who will assist you with this process. For more information on how to view your Sender Profile details, please see the Sender Profile Help topic.
SMS Text
For SMS Text Campaigns, a unique Sender Profile is set up for a Short Code.
Push Notification
A Push Notification is a short message (maximum of 2000 characters) that's viewable within an associated application on a customer's mobile device, such as a smartphone or tablet. For the Push Notification channel, a Sender Profile is set up for an app (or optionally for a group of apps).
For Email Campaigns, Sender Profiles include the following information:
Friendly From: Within a Sender Profile for the Email channel, you can define one or more "From" email addresses, along with the friendly version of those addresses. The "friendly from" is an important aspect of email marketing, and should be chosen carefully, as it's what consumers will see in their inbox. In most cases, you want to use a "friendly from," such as your company name, brand name, or publication name. A consumer can easily identify your message in his or her inbox if the "from" is something like your company name, as opposed to a full email address.
Redirect Tracking Server: The link tracking domain.
Virtual Mail Transfer Agent (VMTA) Pool: A set of shared or dedicated IP addresses that will be used to reach the Internet Service Provider and deliver your email messages. IP addresses must go through a careful, gradual process of establishing a good reputation with ISPs (a process known as "IP warming"). ISPs will refuse to deliver email messages from IP addresses that they view as spammers. Providers use a variety of metrics, such as mailing volumes, complaints, and engagement to determine the reputation of an IP address. Your Messaging support team can assist you with setting up an effective IP warming strategy that will ensure a good sender reputation. A Sender Profile can have one or more VMTA Pools. If you have more than one, you’ll be prompted to select one when you create an email Campaign.
Classification: The Sender Profile Classification allows you to organize your Sender Profiles based on their intended purpose -- sending "promotional" messages (such as special offers) or sending "transactional" messages (such as password resets or order confirmations). If this feature is enabled, the Classification setting can be used to manage recipient eligibility across Sender Profiles, within the same sending table. When you select a Sender Profile in a Campaign, the platform will suppress any recipients unsubscribed from other Sender Profiles with the same Classification, on the same sending table. See below for more details.
Note: The use of Sender Profile Classifications is required for Campaigns that use EDP as the data source; Classifications are optional for Campaigns that use a Messaging table as the data source.
LINE
LINE is a messaging and communications app for electronic devices such as smartphones, tablet computers, and personal computers. LINE is available as a Campaign channel within Messaging, allowing clients to send messages in the form of text, emojis, images, and stickers directly to their subscribed users. For LINE Campaigns, a unique Sender Profile is set up for a LINE Account.
Table Configuration
When you create a Campaign in one of the above channels, you'll be prompted to select the Sender Profile you want to use. However, before you can use a Sender Profile in a Campaign, it must first be associated with a field of the corresponding Data Type ("Email," "Phone," "Push Registration ID," or "LINE Contact MID") on your Campaign source table. Any field of those types can have one (or more) Sender Profiles associated with it; however, you’re not required to associate a Sender Profile unless you intend to deploy messages from that field. For example, if you have a “Business Phone” field that you don’t intend to use for SMS Text marketing, then you don’t need to associate a Sender Profile to that phone field.
For more information on how to assign a Sender Profile to a field in your source table, please see Assign a Sender Profile to a Campaign Source Table
Status ID
When you associate a Sender Profile to a field in your Campaign source table, the system automatically creates a corresponding “Status ID” field in this table.
As an example, let’s say you deploy both promotional and operational Campaigns from a [work_email] field in your Recipient table. To support this situation, you have two different Sender Profiles. When you associate these two Sender Profiles to the [work_email] field, the system will automatically create two Status ID fields.
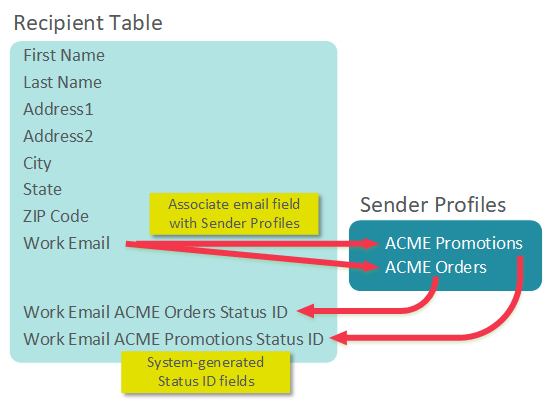
The Status ID field uses various Status ID Codes (listed below) to indicate the eligibility of this consumer to be included in a Campaign. Records with Status ID values less than or equal to 999 are eligible to be included in a Campaign. Records with values of 1000 and greater will be automatically suppressed from Campaigns.
Please note that not every channel uses all of these values. The chart below indicates which Status ID values are relevant to which channels.
Status ID |
Definition |
SMS Text |
Push |
LINE |
|
Null / 100 |
Active |
|
|
|
|
500 |
Opt-Out Via Proof |
|
|
|
|
1100 |
Inactive |
|
|
|
|
1300 |
Soft Bounce |
|
|
|
|
1350 |
Hard Bounce |
|
|
|
|
1500 |
Opt-Out Via Form |
|
|
|
|
1525 |
Opt-Out Via Reply |
|
|
|
|
1550 |
Spam Compliant Via ISP Feedback Loop |
|
|
|
|
1575 |
Banned Address |
|
|
|
|
Note: A Soft Bounce will not immediately result in a consumer being made ineligible for Campaigns. A Soft Bounce indicates some technical issue that may be temporary, so you should try again to reach that consumer. Conversely, a Hard Bounce indicates an issue that will likely never work, such as an invalid or non-existing domain, for example. Please see Soft Bounce Retries for more information on the default configuration settings for Soft Bounces.
Using a Sender Profile in a Campaign
When you create an Email, SMS Text, Push Notification, or LINE Campaign in Messaging, you must select a Sender Profile from a list of all the Sender Profiles (for that channel) defined in your account. Then, when you deploy that Campaign, the system automatically checks the corresponding Status ID field for that Sender Profile, to determine the eligibility of this consumer to receive this message. Unlike Preference fields (the use of which is optional), the use of the Sender Profile Status ID field to determine a consumer's eligibility is mandatory.
For more information on how to select a Sender Profile in your Campaign, please see Assign a Sender Profile to a Campaign.
For example, let’s say you create an email Campaign using the “ACME Promotions” Sender Profile depicted above, and you send this message to ‘john.smith@yahoo.com.’ This consumer then decides he doesn’t want to receive these messages anymore, so he submits the unsubscribe form. When the platform receives this opt-out request, it will set the “Work Email ACME Promotions Status ID” field to ‘1500-Opt Out via Form.’ This consumer will no longer be able to receive any Campaigns that deploy using the “ACME Promotions” Sender Profile.
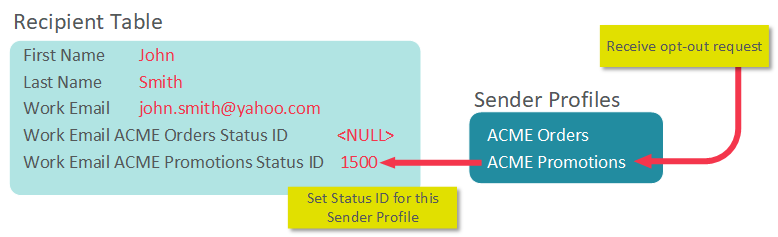
Continuing this example, let’s say this consumer purchases a product, and you need to send an order confirmation using the “ACME Orders” Sender Profile. When this email is deployed, the platform will check the Status ID for the “ACME Orders Status ID” field. Even though this consumer opted out of receiving promotional emails, he would still be eligible to receive operational emails, because those emails are being deployed using a different Sender Profile, with its own corresponding Status ID. In this example, the Status ID for operational emails is ‘Null’ (active), so this consumer is eligible to receive this message.
As the above example illustrates, by using multiple Sender Profiles for different messaging purposes, you can maintain separate contact eligibility status for your consumers. Therefore, a consumer who isn’t interested in receiving promotional marketing messages could still receive operational messages, such as order confirmations. By keeping the status fields separate, you maintain a good sending reputation with the Internet Service Providers.
Unique Identifiers
A Sender Profile and its corresponding Status ID field always associate back to the Unique Identifier (sometimes called the “Alternate Key” or “AK_ID”) on the table where the Sender Profile has been associated. For example, on a Recipient table where the Unique Identifier is [email_address], then all Status ID changes relate to the [email_address] field.
For more information on Unique Identifiers, please see Define the Unique Identifier.
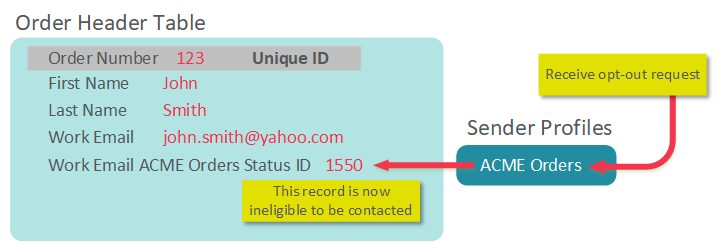
The situation becomes more complex on a table that has some other field as the Unique Identifier. Take for example, an Order Header table used to send out order confirmation messages. This table has [email_address] as an attribute, but it’s not the Unique Identifier. Instead, this table uses [order_number] as the Unique Identifier.
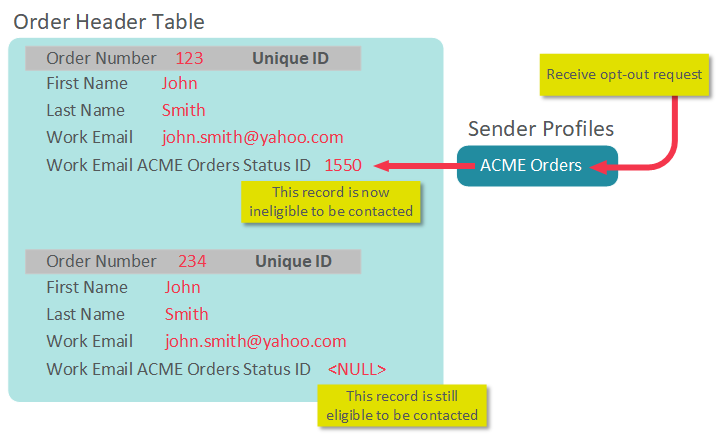
Continuing this example, let’s say ‘john.smith@yahoo.com’ places Order #123. The platform generates the order confirmation message, and sends the email using the “ACME Orders” Sender Profile. The consumer clicks the “this is spam” button in Yahoo. The platform would then update the Status ID for this Sender Profile, for Order #123 only, to ‘1550 – Opt-out Via Feedback Loop.’ All subsequent messages regarding this order would be suppressed. For example, let’s say you try to send the shipment notification regarding this order to this consumer. The platform would automatically suppress this message, because the Unique Identifier ([order_number] = ‘123’) is now ineligible to receive messages.
However, if ‘john.smith@yahoo.com’ were to place Order #234, he would qualify to receive messages regarding this new order, because the Sender Profile tied to that Unique Identifier ([order_number] = ‘234) is still eligible to receive messages.
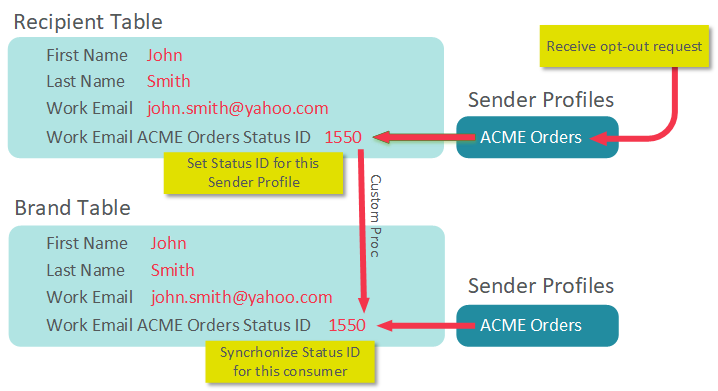
Using Multiple Source Tables
Many clients deploy Campaigns from multiple source tables. Each source table must have one or more Sender Profiles associated to the “Email” Data Type field (or “Phone,” or “Push Registration ID,” or “LINE Account ID” Data Type field) used to contact the consumer. If these tables will be using the same Sender Profile, the database can be designed such that the platform synchronizes the Sender Profile’s Status ID field values across all such tables.
In this manner, if a consumer unsubscribes from a Campaign sent from a Sender Profile in one table, the platform can set the Status ID values in all the other tables that utilize that same Sender Profile. This synchronization can be done using import / export processing, or through a custom procedure.
Note: This synchronization is not “real-time,” but is instead based on the scheduling of whichever method is used to accomplish the synchronization; in many cases, this process is run once a day.
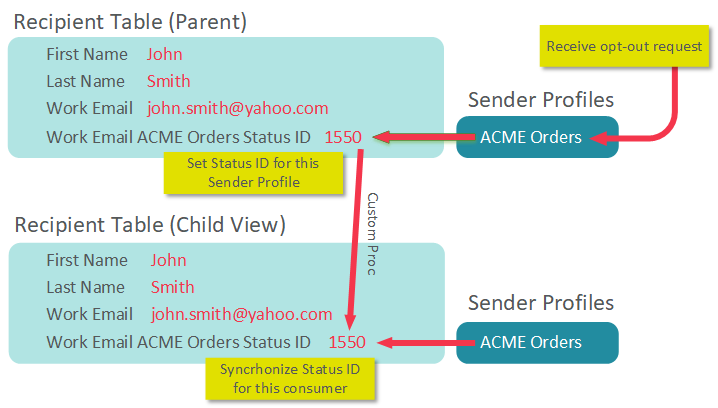
This synchronization of the Status ID can also be applied in a database that uses a Parent / Child configuration. A Parent / Child solution is a more complex architecture that uses top-level Parent tables, with one or more Child tables. The Child tables can be thought of as “views,” where only certain Parent-level tables, or fields, are made accessible to the Child. Parent / Child set-ups are typically used for clients who have multiple brands or divisions that they need to keep distinct in the database (for example, a user working in Brand A can’t see any of the customers from Brand B).
If you have a Parent / Child architecture, you can synchronize the Status ID values between the Parent and the Child views, or between Child views, through the use of import / export processing, or by using a custom procedure.
Re-Opt-Ins
A "re-opt-in" refers to the process of a consumer submitting an opt-in request after he or she had previously opt-ed out. By default, re-opt-ins for a Sender Profile Status ID are not allowed. However, if desired, you may choose to allow re-opt-ins as a configurable setting.
Re-opt-ins are handled by means of an Advanced Field Option on your Data Map called "Insert Null." When you import data into the platform, you can optionally configure your Data Map with the "Insert Null" option enabled for a Status ID field. If the Status ID field on the import file is empty, the system will overwrite any existing data in that field with NULL.
For example, let's say that John Smith's current Sender Profile Status ID is "1550 - Opt-out Via Feedback Loop." You then import a file with John Smith in it, and the Status ID on the import file is blank. If you have the "Insert Null" option enabled for this field, the platform will overwrite the existing "1550" value with "NULL." Since a NULL value in a Status ID indicates an "active" status, this consumer will again be eligible to be contacted.
If you decide to allow re-opt-ins, Cheetah Digital recommends that you create a special, dedicated "opt-in import" that's used ONLY for processing opt-in information, and that you enable the "Insert Null" feature only for this import file.
Reporting
Messaging tracks Status ID opt-out activities for auditing and customer service requests. You can view a customer’s history of opt-out activity by date and time using the Record Lookup screen.
Classifications
Sender Profile Classifications allow you to organize your Sender Profiles based on their intended purpose -- "promotional" or "transactional." The Classification setting is used for managing recipient eligibility across Sender Profiles, within the same sending table.
Note: The use of Sender Profile Classifications is required for Campaigns that use EDP as the data source; Classifications are optional for Campaigns that use a Messaging table as the data source
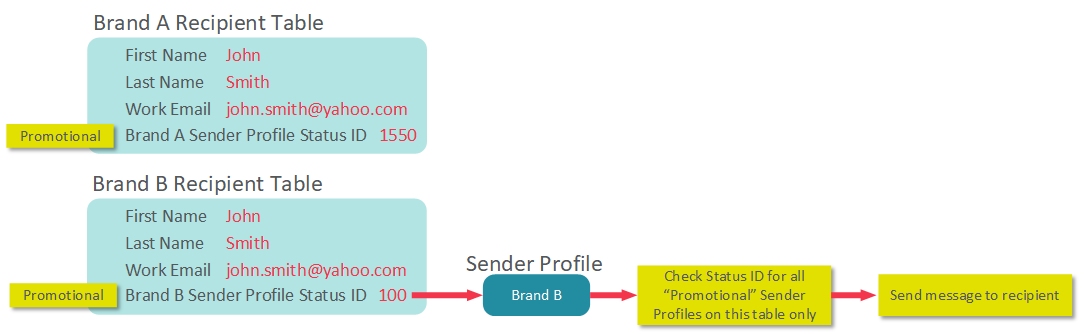
Consider the following examples for a client who has enabled Classifications for their Sender Profiles.
The client builds a Campaign using a Messaging table as the data source. The client has two Sender Profiles defined on their Recipient table: Brand A Sender Profile and Brand B Sender Profile. Both Sender Profiles have been classified as "Promotional." The client builds a Campaign using Brand B, and the recipient John Smith is selected as part of the Campaign audience. This recipient's Status ID of 100 for Brand B makes him eligible to receive the Campaign. However, he has opted out of Brand A. The Messaging platform checks the Status ID value for all Promotional Sender Profiles on this table. Seeing that John Smith has a Status ID of 1550 for Brand A, the platform would suppress this recipient from the Campaign.

As another example, let's say that the client has classified Brand A as "transactional" and Brand B as "promotional." The client builds a Campaign using Brand B. In this example, John Smith would NOT be suppressed, even though he has opted-out of Brand A. Because Brand A has a different classification than the Sender Profile used in the Campaign, the Messaging platform does not use that Sender Profile to determine the recipient's eligibility.

As another example, let's say the client uses two different Recipient tables for their two brands. Each table has its own Sender Profile, and both Sender Profiles have been classified as "promotional." The client builds a Campaign off the Brand B Recipient table. In this example, John Smith would NOT be suppressed, even though he has opted-out of Brand A. When using classifications to determine recipient eligibility, the Messaging platform looks at only Sender Profile Status IDs on the same table. The fact that the recipient has a Status ID of 1550 on Table A would not impact a Campaign built off of Table B.
EDP-based Sending
For clients who use the Engagement Data Platform (EDP) component of the Customer Engagement Suite, you can create Campaigns that use EDP as the Campaign's data source, rather than a Messaging table. EDP-driven Campaigns utilize a client-level "suspend email" attribute that controls each recipient's opt-in / opt-out status. Messaging will always check this attribute when determining recipient eligibility to be contacted.
In addition, EDP supports the concept of Business Units for clients who have separate brands or divisions. Within EDP, you can define a Business Unit-level attribute to control recipient eligibility only for that Business Unit. In this manner, each brand or division can maintain their own recipient eligibility, without impacting the other brands or divisions. If you have Business Units defined in your account, when you create an EDP-driven Campaign, Messaging will check both the Business Unit-level attribute AND the client-level "suspend email" attribute. The platform will suppress recipients who have opted-out at either level.
Back to Getting Started with Messaging