 Preferences
Overview
Preferences, along with Sender Profiles, allow you to manage which recipients in your database are eligible to be contacted in your Campaigns. Unlike the Sender Profile Status ID (the use of which is mandatory), the use of Preference fields is optional.
Preference fields (sometimes referred to as a "Permission" or a "Subscription") provide a more granular level of permission management than Sender Profiles. Preferences utilize a special Data Type that’s used to control whether or not a consumer has opted-in or opted-out of receiving messages. The data values supported by a Preference field are:
Value |
Definition |
Null |
No preference indicated |
100 |
Opt-in |
1500 |
Opt-out |
Preferences were developed for clients who need a method of maintaining individual subscription permissions, so their customers can opt-in or opt-out of particular types of communications, rather than ALL communications being deployed from a given Sender Profile (which is what the Status ID of a particular Sender Profile maintains). For example, you could define Preference fields for your different email communication types, such as newsletters, new product recommendations, and promotional offers. Preferences can be thought of as a sub-set of a Sender Profile. A consumer could opt-out of a specific type of message, but still be considered “eligible” within the overall Sender Profile.
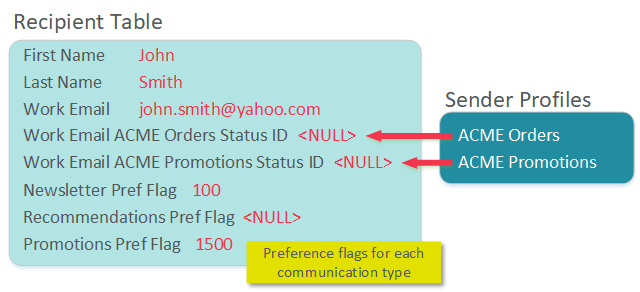
It’s important to note the distinction between what actions are identified and managed at the Sender Profile level and at the Preference level. The Sender Profile captures Soft Bounces, Hard Bounces, Opt-outs Via Reply, and Opt-outs Via Feedback Loops, as well as Banned Address information. A consumer’s status as it relates to these events is always tracked at the Sender Profile level, and not at the Preference level. If you require a "global" opt-out of all communications, or if you're capturing opt-out requests from off-line sources (such as a customer service telephone number or through postal mail), then you should update the Sender Profile Status ID accordingly.
Conversely, a Preference field should be used to track granular, user-provided, opt-out information. If a consumer is opt-ing out of a particular communication type, then you should update the corresponding Preference flag, rather than the Sender Profile.
Filters
When a Campaign is launched, the system automatically checks the Sender Profile Status ID to verify a consumer’s eligibility to be contacted. Preferences, on the other hand, typically rely on the use of Filters (unless you’re using “required” Preferences, which are defined below).
A Filter is a set of logical criteria, or business rules, used to build the intended target audience that you want to receive your message. When the platform applies your Filter, it searches the database for records that match these criteria. A Filter can be a simple one-line rule (e.g., [gender] = ‘male’), or they can be very complex, with logical operators, mathematical operators, consumer activity, nested groups, calculated fields, and fields on joined tables.
To use Preferences in your Campaign, you must define a Filter that targets the desired Preference field(s) and value(s). You then assign this Filter to your Campaign. The platform will use the rules defined in the Filter to identify and select the desired customers that fit the criteria.
For example, let’s say you want to create a promotional email Campaign that targets consumers who have opted-in to receive your promotional email messages. You would create a Filter with the logical rule: [promotions_pref] = ‘100’ in order to select only those customers who have opted-in to receiving promotional email messages.
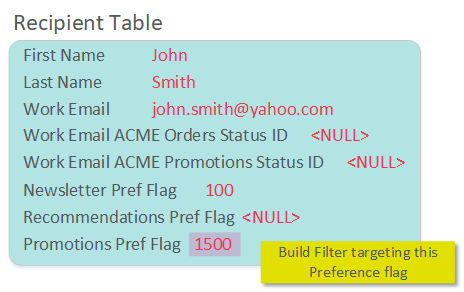
This particular consumer depicted above wouldn’t get selected by the Filter because his Promotions preference is ‘1500 – Opted Out.’ Therefore, this consumer would not be part of the Campaign’s target audience.
Conversely, if you were to create a Newsletter Campaign, you would create a Filter with the logical rule: [newsletter_pref] = ‘100.’ The consumer depicted above matches this business rule, and therefore would get selected as part of the Campaign audience.
Additionally, let’s consider the case of a Recommendations Campaign. If you build the Filter with the logical rule [recommendations_pref] = ‘100,’ then john.smith@yahoo.com wouldn’t qualify, as he has a value of 'NULL' in this Preference field. However, you could expand the logical criteria in the Filter to [recommendations_pref] <> ‘1500.’ This consumer would get selected by this Filter, as this logic selects both the opt-ins (100) and the undetermined (NULL).
Therefore, when you build your Filter criteria, it’s important to remember that a Preference flag has THREE possible values, and to write your business logic to target the value, or values, that meet your contact strategy.
User Preferences in a Campaign
If a consumer is selected by a Filter, the platform always checks the Sender Profile Status ID to see if this consumer is eligible to receive the mailing. A consumer must meet BOTH conditions – inclusion in the Filter audience, and an active Status ID. Ultimately, the Sender Profile Status ID takes precedence over the Preference value.
For example, let’s say that john.smith@yahoo.com received an email message sent using the “ACME Promotions” Sender Profile. He clicked the “this is spam” button in Yahoo, and the platform set his corresponding Status ID for this Sender Profile to ‘1550 – Opt-out via Feedback Loop.’
Then, in a subsequent Campaign, you build a Filter that targets consumers that have opted-in to your Newsletter emails. If you were to build a Campaign using this Newsletter Filter and the “ACME Promotions” Sender Profile, customer john.smith@yahoo.com would not be eligible to receive this message. He would be selected by the Filter (because his [newsletter_pref] is ‘100’]. However, when you launch the Campaign, the platform validates the Status ID for every person selected in the audience Filter. Since this particular consumer has a Status ID value of ‘1550,’ he would automatically be suppressed from the Campaign.
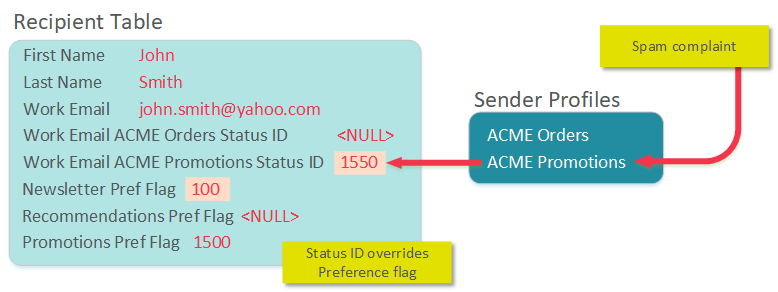
As you can see, the Sender Profile Status ID always takes precedence over the Preference flags. In particular, Feedback Loop unsubscribes like in the above example can be very damaging to a sender’s reputation, which is why the platform always checks for this status at the Sender Profile level.
Note: Any changes made to a Sender Profile Status ID are NOT applied to any of the Preference flags in this table. In the above example, when john.smith@yahoo.com opted-out via feedback loop, the platform changed his Status ID flag accordingly. The platform doesn’t make any changes to the Preference flags in this situation.
Required Preferences
If desired, Preferences can be marked as “required” for specific Sender Profiles. When enabled, the Preference will be enforced within the Campaign process to prevent users from creating and deploying Campaigns to consumers who have opted-out of a particular Preference, or who have not explicitly opted-in to a particular Preference. This feature helps eliminate human error in manual field management for opt-in / opt-out status.
Note: This feature is available only for Sender Profiles in the email Channel.
The determination of whether you must check a Preference flag is set by a system administrator at a Sender Profile level. Each Sender Profile can optionally be configured to require a Preference flag check. If you're using a Sender Profile that has this requirement in place, then the Campaign detail screen will display a "Preferences" field. The system will require you to select at least one Preference flag when you build the Campaign.
Preference selection on the Campaign detail screen is applied after the Filter’s audience criteria is applied. Once the Filter criteria is executed (as part of the Message Creation step), the platform will remove records that don’t have an Opt-in status for the Preference that you selected on the Campaign details screen.
The platform allows you to define the logical condition for the Preference flags(s) used in the Campaign. You can configure the logic to select recipients who are either subscribed or not subscribed. Also, if you're using multiple Preference flags in the Campaign, you can use either an OR condition or an AND condition.
Re-Opt-Ins
A "re-opt-in" refers to the process of a consumer submitting an opt-in request after he or she had previously opt-ed out. By default, re-opt-ins for a Preference field are allowed. However, if desired, you may choose to prohibit re-opt-ins as a configurable setting.
Re-opt-ins are handled by means of an Advanced Field Option on your Data Map called "Don't Re-opt-in." When you import data into the platform, you can optionally configure your Data Map with the "Don't Re-opt-in" option enabled for a specific Preference field.
For example, let's say that John Smith's "Promotions" preference flag is currently set to "1500 - Opt Out." You then import a file with John Smith in it, and the "Promotions" Preference field in the import file is "100 - Opt-in." If you have the "Don't Re-opt-in" option enabled for this field, the platform will NOT overwrite the existing "1500" value with "100." In this scenario, the consumer's opt-out status will not be modified.
Reporting
Messaging tracks subscriber opt-in / opt-out activities for auditing and customer service requests. You can view a customer’s history of opt-in / opt-out activity by date and time using the Record Lookup screen.
Back to Getting Started with Messaging