Web Pages

Overview

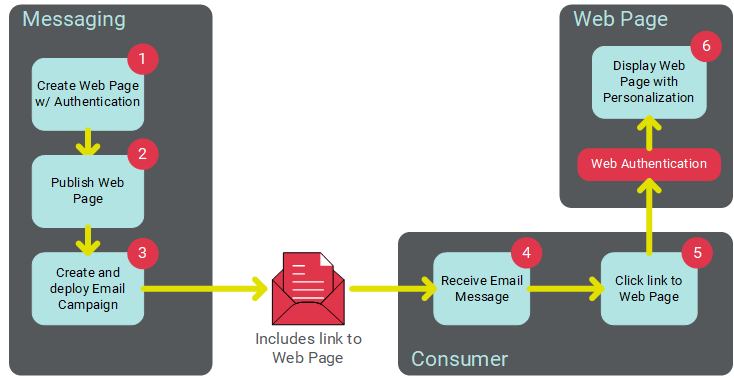
Marigold Engage+ allows you to create Web Pages that are hosted within the platform. Web Pages are considered a special type of marketing channel. A Web Page operates in much the same way as other channels, such as Email or SMS Text, except that you don't create a "Campaign" for your web content. Instead, you create and publish a Web Page, which can have dynamic content and link tracking, and can be used to gather customer-supplied data. You can then provide a link to this Web Page through other channels, such as an Email message.

The following diagram depicts this process of using a Web Page in conjunction with an Email Campaign. The email message contains a link to the Web Page. When the customer clicks this link, the URL passes the necessary identifying information (via a Web Authentication) to the Web Page to validate the customer's identity, in order to display the correct personalization values.


Note: These Help topics assume that you have a thorough understanding of HTML and web page coding.

Web Page with a Web Form

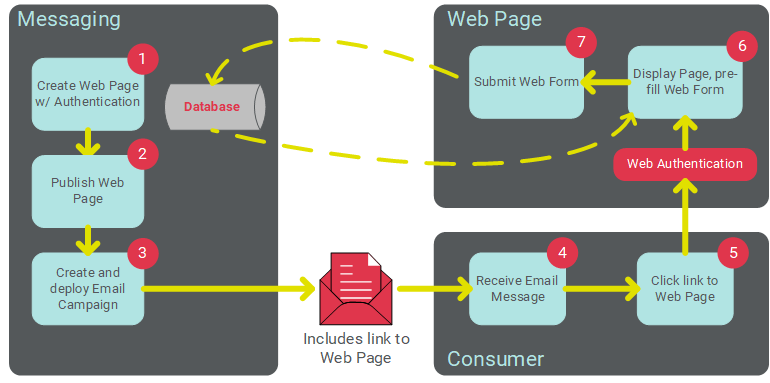
Web Pages can optionally contain simple data entry forms in order to collect information about your customers (see Web Forms for more details). The Web Page screen allows you to add a simple Web Form to the Page. Web Pages with Forms are treated much like a "channel," and they support the use of dynamic content and personalized content. Data collected from the Web Page with Form is sent via an HTTP(S) request, parsed, and loaded to the database.

Web Pages with Forms support the use of Web Authentications to verify the consumer's identify for the purposes of calculating dynamic content and pre-filling fields in the Form. Web Pages with Forms support link tracking for reporting purposes, as well as the use of a confirmation page. Web Pages with Forms do not support Personalized URLs or exception notifications. In addition, the submission of a Web Page-based Form can't be used to trigger the deployment of a Campaign.

The following diagram depicts this process of using a Web Page with Form in conjunction with an Email Campaign. The email message contains a link to the Web Page. When the customer clicks this link, the URL passes the necessary identifying information (via a Web Authentication) to the Web Page to validate the customer's identity, in order to display the correct personalization values. The customer then fills out and submits the Form, and the data from the Form is passed to Messaging.

Access

The Web Pages screen is accessible by the following method:

Create a Web Page

The steps for creating a new Web Page are described below

 Create a New Web Page

Click hereClick here

Web Pages can either be created through the Engage+ user interface, or uploaded into the platform (see New Item: Create a New Web Page).

To create a new Web Page through the user interface:

  1. In the Tool Ribbon, click  new Web Page, or alternately from the Admin banner bar, select + New menu > Web Page.  

  2. A "New Item" pop-up window is displayed. To select the folder where you want to save this new Web Page, click the folder name in the Navigation Tree on the left side of this pop-up. The "Where?" field is updated with the selected folder name.

  3. In the "Name" field, enter a name for your new Web Page. This name must be unique within the selected folder.

  4. From the "Data Source" drop-down menu, select the source table for this Web Page.

Note: You can never modify this source table after the Web Page is created.

  1. Click Create. The Workspace is refreshed to show a blank Web Page details screen.

  2. To assign Metadata values to your Web Page, click Edit > Set Metadata in the Tool Ribbon. The Metadata pop-up window is displayed, listing every Metadata field defined for this account. Enter or select the desired Metadata values, then click ok (see Metadata Settings for more details on how to set up Metadata fields).

  3. Optionally, you can assign one or more tags to your Web Page. To assign a tag, click on the "Add tag" field in the Edit > Tags section of the Tool Ribbon. The system displays a pop-up menu of all the existing tags. You can select one of these tags, or type in a new one and press Enter. You can repeat this process to add more tags. To remove a tag, click the "X" icon next to the tag label.  


 Web Page: Content

Click hereClick here

The Content section is used to define the content of your Web Page.

  1. Optionally, place a check mark in the "Run On Fly" check box. If the dynamic content logic on the page is fairly simple (or if you're not using dynamic content), you can select this option. In this case, the system will generate and display the dynamic content when the viewer lands on the Page. Conversely, if the Web Page utilizes complex dynamic content logic, the viewer may encounter long load times when they navigate to the Page. To improve performance, you can pre-calculate the content on a scheduled basis. If you uncheck this check box, you must enter the schedule for how often you want to pre-calculate the dynamic content, and optionally for which audience of consumers. Please work with your Client Services Representative to help identify an appropriate frequency based on your audience size and the complexity of your dynamic content.

Define Pre-calculate ScheduleDefine Pre-calculate Schedule

To define the schedule for pre-calculating dynamic content in your Web Page:

  1. From the "Time Zone" drop-down menu, select the time zone to be used for this schedule. By default, the time zone from your user profile is selected.  

  2. Optionally, from the "Pre-Queue Records" field, select the Filter that defines the audience of customers for whom you want to pre-calculate the dynamic content. The platform allows you to either search for a Filter, or browse to it.

  • To search for a Filter -- In the "Audience" field, begin typing the name of the desired Filter. The system displays a drop-down menu of Filters that contain that text string anywhere within the Filter name. From this list, select a Filter.

Note: If you search for and select a Filter that has a different source table than the Web Page, the system will display an error message at the top of the Web Page screen.

  • To browse for a Filter -- Click the browse button (magnifying glass icon) to the right of the Filter field. The "Browse Filters" pop-up window is displayed. From this window, you can click on a folder in the directory structure to see a list of all the Filters stored within that Folder that have the same source table as this Web Page. Or, if you want to search across the entire system, click the left arrow icon near the top of the directory structure; the system collapses the directory structure and shows every Filter in the system. This pop-up window also allows you to search based on Tags, or by Filter name. When you find the desired Filter, click on its name.

  1. Define the schedule's recurrence frequency:

  • Daily: Enter an interval (every "X" days).

  • Weekly: Select one or more days of the week.

  • Monthly: Select either:

  • A specific number ("15th of the month" for example).

  • Define a business rule to calculate a date ("second Tuesday of every month" for example).

  • Yearly: Select either:

  • A specific month / date ("January 15th" for example).

  • Define a business rule to calculate a date ("second Wednesday in August" for example).

  • Select the schedule run time:

  • Once a day: Enter a specific start time.

  1. Several times a day: Define an interval in either minutes or hours. Also, define the active window during which the schedule can be run by selecting the starting and ending times for this window.


  1. Messaging allows you to utilize custom stored procedures. These stored procedures must be defined and configured by your Cheetah Digital support team, which makes them available for selection when setting up your Web Page. To use a custom stored procedure in your Web Page, click Edit > Special Processing in the Tool Ribbon. The system adds a new "Special Processing" section. From the "Special Processing" drop-down menu, select the desired stored procedure. This drop-down menu contains every custom stored procedure that has been configured for your account.

  2. Place a check mark next to one or more Web Authentications. A Web Authentication consists of a field (or fields) used to uniquely identify a customer when he or she lands on the Web Page. The Web Authentication controls how the Page will determine who the viewer is in order to display the correct dynamic content personalized to that customer (see Web Authentications for more details).

  3. Enter, or copy-and-paste, the Web Page content into the Advanced Editor. For more details on how to use the Advanced Editor, please see the Advanced Editor Help topic.

  4. The tabs across the top of the Content field indicate which format version of your message you're currently editing. A Web Page will have an "HTML - Web" version by default. You can optionally also add "HTML - Share to Social," "HTML - iPhone," and "HTML - Mobile Web" versions. To switch to a different version of your message, click the appropriate tab.

  5. The "Summary" field beneath the Content field is used only if you're utilizing a Facebook Like Button within your Web Page content. This Summary consists of a short message that appears on the interstitial webpage after the recipient clicks the Like button. Optionally, enter your message in the "Summary" field.

  6. Optionally, to see a mockup of your Web Page, click Edit > Preview in the Tool Ribbon. The Preview screen is displayed. If your Page contains Personalization Fields, the pane on the right-hand side of the screen lists each of these fields. Optionally, type in a value; the system refreshes the preview screen with this value inserted into the message. When finished, click Edit > Edit in the Tool Ribbon to return to the Advanced Editor.

  7. In the Tool Ribbon, click Edit > Save. 


 Web Page: Collect Data

Click hereClick here

Web Pages can optionally contain a Web Form to collect information about your consumers, such as email preferences or contact information. The Collect Data section is used to define the parameters of the Web Form. Web Pages with Forms can use Web Authentications to validate the consumer's identity, in order to display the correct personalization values, AND to pre-fill as much information as possible into the Web Form .  

Note: If you need help building the HTML code for a Web Form , the system provides sample code you can use as a reference. From the Functional Menu, select "Sample Code." From the "Select Sample Code" drop-down menu, select "HTML Form."

To include a Web Form in your Web Page:

  1. Check "Include Form." The "Data Options" sub-section is displayed.

Data Options

The Data Options sub-section is used to define what data you intend to collect from the customer, and where you want to store this information in your database.

  1. Optionally check "Sanitize Data Fields" to encode all fields in the Web Page. This feature is intended to prevent cross-site scripting (XSS) vulnerabilities in your Web Page. If enabled, the platform will automatically encode all fields in the form. You can optionally choose to leave specific fields un-encoded by attaching the suffix " unsafe" (with a space) to the field name. For example: "email unsafe." 

Note: The Sanitize Data Fields option is enabled by default in all new Web Pages created after release 21.10 (October 2021) of Cheetah Messaging. All Web Pages created prior to this release will have this feature disabled by default. You can optionally enable the feature in older Web Pages, or you can choose to encode specific fields by attacking the suffix " safe" (with a space) to the field name. For example: "email safe." Cheetah Digital's best practice is to enable this feature, but please note that enabling the feature in older Web Pages may cause changes to the format of field content, so be sure to test the Web Page after enabling this feature.


  1. Select a data mapping option:

SimpleSimple

The "Simple" mapping option allows you to select one or more fields on the Web Form's source table.

  1. Select the "Simple" tab.

  2. From the Data Processing drop-down menu, select one of the following options that controls how the system handles the Web Form data:

  • Update or Create All Records: Select this option if you want the form to create new records, and update existing records.

  • Only Update Existing Records: Select this option if you want the form to only update existing records (new records are ignored).  

  • Only Create New Records: Select this option if you want the form to only create new records (updates to existing records are ignored).

  1. To remove a field from the Form, click the "X" icon next to the field name within the "Mapped Fields" list box. To rearrange the fields in the Form, drag-and-drop the fields within the "Mapped Fields" list box into the desired sequence. To move a field to the top or bottom of the "Mapped Fields" list box, click the field to select it, then click the up-arrow or down-arrow icon.

AdvancedAdvanced

The "Advanced" option lets you pick an existing Data Map to use when bringing data in through the Web Form. Data Maps provide more sophisticated import options.

  1. Select the "Advanced" tab.

  2. In the "Data Map" field, either begin typing in the Data Map name, or click the browse button (magnifying glass icon) to browse for and select it. You can also create a new Data Map by clicking the new button (plus-sign icon). See Data Maps for more details.

  3. Optionally, if you want to view the details of the Data Map after selecting it, click the "jump-to" button (green up-arrow icon). The system displays the Data Maps screen.  


  1. The "Hierarchy Options" drop-down menu is typically used if your account utilizes a multi-division setup, such as a Parent / Child database. Hierarchy Rules are a configuration feature set in the Parent system that determine which records from a given table a Child system can access. From this drop-down menu, select one of the following options:

  • Update Records in Current Customer Only: This option will load the data to the Parent system only.

  • Update Records in Current Customer and Children: This option will load the data to the Parent, and to any Child systems as well.

  • Custom Hierarchy Rule: This option allows you to select a custom Hierarchy Rule. If you select this option, the Hierarchy Rule field is displayed. To use an existing Hierarchy Rule, either begin typing in the Hierarchy Rule name, or click the browse button (magnifying glass icon) to browse for and select it. You can also create a new Hierarchy Rule by clicking the new button (plus-sign icon).  

  1. If your account contains custom stored procedures, you can optionally run a stored procedure after the record in the Web Form is processed. From the Post-Update drop-down menu, selected the desired custom stored procedure.

  2. Optionally, in the "Maximum entries per user" field, enter the maximum number of times that a single recipient can submit this Web Form. If a recipient surpasses this threshold, the system displays an error message.

  3. Optionally, in the "Maximum entries per form" field, enter the maximum number of submissions allowable for this Web Form, across all recipients. If the Web Form surpasses this threshold, the system displays an error message.

Note: Be careful when testing Web Form submissions, as the test submissions count toward both of the above thresholds. If you're testing a link to your Web Form from an email message, the platform will count Web Form submissions from your email "proof" recipients, as if they were actual, live email recipients.

  1. If the source table for this Web Page contains Calculated Fields, you can optionally derive and populate a value for those Calculated Fields. Click the "Run Calculated Fields" tab. The "Available Fields" list box is populated with all of the Calculated Fields in the source table. Select a field in the "Available Fields" list box, then click the center "Move" bar. Optionally, you can use Shift + click or Control + click to select and move multiple fields. The selected field (or fields) is added to the "Selected Fields" list box. Repeat this step as needed to add more Calculated Fields. To remove a Calculated Field, click the "X" icon next to the field name within the "Selected Fields" list box.

Note: If you run a Calculated Field as part of a Web Form, the system derives and populates that field only for the record in the Web Form. Conversely, if you set up a Calculated Field schedule, the system derives and populates the field for every record in the table (see

Confirmation Options

The Confirmation Options sub-section is used to define what you want to display to the customer after he or she submits the Web Form. For example, you can display a "Thank you" message.

You can also define a confirmation page using the "cp" parameter. For example:

<input type="hidden" name="cp" value="http://www.cheetahdigital.com" />

  1. Select a confirmation page option:

Web Page URLWeb Page URL

To display an externally-hosted web page:

  1. Click the "URL" tab.

  2. Enter the URL for the confirmation page.

Enter Web Page ContentEnter Web Page Content

To display a web page that's hosted by Messaging:

  1. Click the "HTML" tab.

  2. Enter the content for the confirmation page.


  1. If you provided the confirmation page using the "cp" parameter , check the check box labeled, "Confirmation page URL indicated in form code via 'cp=' parameter." This check box instructs the platform to use the "cp" parameter value, and not to use anything provided above in step 7. Conversely, leave the check box unchecked to use the page you provided above in step 7.

  2. In the Tool Ribbon, click Edit > Save.


 Web Page: Schedule

Click hereClick here

The Web Page Schedule section provides several options for disabling, or expiring, this Web Page.  

  1. Optionally, to define a start schedule for the Web Page, click the "Start On" toggle next to "Web Page Start Date," then enter the start date and start time. Optionally, to make the Web Page available immediately after it's published, click the "Start Immediately" toggle.

Note: If using the schedule feature, when you publish your Web Page, it won't yet be available until the schedule's start date. 

  1. Optionally, to define an expiration schedule for the Web Page, click the "End On" toggle next to "Web Page End Date," then enter the end date and end time. After the designated end date / time,  the system will return the Expiration message (described below). Optionally, to make the Web Page run indefinitely, click the "Run Indefinitely" toggle.

  2. In the Tool Ribbon, click Edit > Save.

If your Web Page is finished, the next step is to publish it. See "Publish a Web Page" below for more details on this process.


 Web Page: Expiration

Click hereClick here

If you defined an end date for the Web Page in the "Web Page Schedule" section above, you can define the content that gets displayed to the recipient if they attempt to access an expired Web Page.

To define the expiration content:

  1. Select an expiration page option:

Externally-hosted Web PageExternally-hosted Web Page

To display a web page that's hosted externally to the Messaging platform:

  1. Click the "Expiration Page URL" tab.

  2. Enter the URL for the expiration page.

Enter Web Page ContentEnter Web Page Content

To display a web page that's hosted by Messaging:

  1. Click either the "Basic (HTML)" tab or the "Advanced (XSL)" tab.

  2. Enter the HTML or XSL code for the expiration page.


  1. In the Tool Ribbon, click Edit > Save.

If your Web Page is finished, the next step is to publish it. See "Publish a Web Page" below for more details on this process.


 Web Page: Responses

Click hereClick here

The Responses section is used to configure Link Tracking in your Web Page. A Web Page can be configured with specific link tracking details, such as which links to track, what to call those links, and what append codes to use. The platform will parse your Web Page content to attempt to identify links within the content.

  1. Select "Track All Links" to enable link tracking.  

  2. If you have multiple domains set up for your account, the "Link Tracking Domain" drop-down menu is displayed. From this menu, select a domain.

  3. In the "Append Codes" field, optionally enter one or more append codes.

Append Codes are an optional feature used for web tracking purposes through your own tracking system, or through third-party vendors like Omniture and Google Analytics. The code (or codes) entered in this field will be appended to each tracked link in the Page. See Append Codes for more details on this feature.

The "Links Found in Content" section lists all of the links that the system found within the Web Page content. In the "Track?" column, place a check mark next to each link that you want the system to track for reporting purposes.

The individual links will be tracked in reports generated by the platform. Cheetah Digital's best practice is to provide "friendly" names for the links to make these reports easier to read. For example, instead of viewing a URL like "http://www.mycompany.com/homepage.aspx," a friendly name of “Home Page” can be assigned.

In addition to improving report readability, the use of friendly names allows you to keep links distinct from each other, even if they go to the same destination URL. For example, you might have two links to your company's home page within your Web Page content -- one within the header and one within the footer. By giving these two links different friendly names ("Home Header" and "Home Footer" for example), you can track these two links separately.

The system provides several different ways to assign a friendly name for a link:

  • Define the link and the friendly name in the Link Library.   

  • Define the friendly name within the Advanced Editor using one of the following methods:

  • Within the HTML content, add a name attribute ("data-link-name") to the anchor tag. For example:

 <a data-link-name="Cheetah Digital home" href="http://www.cheetahdigital.com">Cheetah Digital Home Page</a>  

  • Within the HTML content, use a new URL merge tag to specify the friendly name. For example:

{@Cheetah Digital home|http://www.cheetahdigital.com@}

  • If the friendly name has not previously been defined through the Link Library, or within the Advanced Editor, then the system will use a default name, such as "Link 01" followed by the URL. You can manually override this default name, and enter a new friendly name in the "Links Found in Content" list.  

  1. Optionally, to test that the URLs in your links are all valid, click Edit > Validate Links in the Tool Ribbon. The system "pings" each URL to see if it gets a response within an optimal amount of time. The results of this test are displayed within the "Valid?" column -- either "Valid" or "Unable to Verify." If you get the "Unable to Verify" message, check that the text of your URL is correct, and that the target link will be working at the time you publish the Web Page. The "Globally Excluded" section lists all of the links found in the message content that have been explicitly set to "Do not track" through the Link Library.

  2. If your Web Page is finished, the next step is to publish it. See "Publish a Web Page" below for more details on this process.


Other Features

This section describes additional features related to managing your Web Pages.

 Copy a Web Page

Click hereClick here

To copy an existing item to use as the basis for a new item:

  1. Search for the desired item (see Search for an Item for more details).

  2. Click on the item name. The main item screen is displayed and populated with the details of the selected item.

  3. In the Tool Ribbon, click Edit > Save as. A "Save as" dialog box is displayed.

  4. Enter a name for the new item.

  5. By default, the new item will be saved in the same folder location as the base item. Optionally, click the magnifying glass icon to browse to and select a different folder location.

  6. Click save a copy. The system creates a copy of the selected item.


 Publish a Web Page

Click hereClick here

After you've created the Web Page to your satisfaction, you must publish it to make it accessible to your customers. Publishing a Web Page in Messaging is analogous to launching a Campaign in another channel, like an Email Campaign or an SMS Text Campaign.

To publish your Web Page:

  1. In the Functional Menu, click "Publishing." The Publish screen is displayed.

  2. In the Tool Ribbon, click Publish > Publish to Web. The Publish screen is refreshed to show details of the publishing process. Click the refresh button (double-blue arrow icon) to see the latest information.

  3. If you need the URL for the published Web Page, click "Generate URLs" in the Functional Menu. Select a domain from the "Domain" drop-down menu. The "Page URL" field displays the final published URL.  


 Add a Web Page Link to a Campaign

Click hereClick here

After you've created the Web Page, you can provide the URL to the Web Page through another marketing channel, such as an Email message, SMS Text message, or Push Notification.

To add a Web Page link to a Campaign message:

  1. Navigate to the desired Campaign (see Campaigns for more details).

  2. Scroll down to the "Message" section, and click edit. The "Advanced Editor" screen is displayed.

  3. Place your cursor in the main content field. The Personalization Pane appears on the right-hand side of the screen.

  4. In the Personalization Pane, click on the "URLs" group to expand it.

  5. Within the "URLs" group, double-click on "Web Page" (or, optionally, you can drag "Web Page" from the Personalization Pane, and drop it into the content field). A "Browse Web Pages" dialog box is displayed.

  6. From the "Browse Web Pages" pop-up window, you can click on a folder in the directory structure to see a list of all the Web Pages stored within that Folder. Or, if you want to search across the entire system, click the double-left arrow icon near the top of the directory structure; the system collapses the directory structure and shows every Web Page in the system. This pop-up window also allows you to search based on Tags, or by name. When you find the desired Web Page, click on its name.

Note: Web Pages have to be created using the same source table as the Campaign in order for them to be available as a selection.

  1. A dialog box is displayed. From the "Domain" drop-down menu, selected the desired domain to use for this Web Page. Click ok.

  2. The system inserts the URL for this Web Page into the message content at the current cursor location. If this Web Page uses a Web Authentication, the Web Authentication fields are included as a query string within the URL.


 View or Edit a Web Page

Click hereClick here

To view or edit an existing Web Page:

  1. Search for the desired Web Page (see Search for an Item for more details on the available search methods).

Note: Even though Web Pages aren't created from the Campaigns screen the way other marketing channels are, your existing Web Pages can be found from the Campaigns screen. When you search for Campaigns, the system displays Web Pages along with all your other Campaigns from all your other channels. In this manner, you can find an existing Web Page from either the Web Page screen, OR from the Campaigns screen.

  1. Click on the Web Page name. The Web Page screen is displayed and populated with the details of the selected Web Page.

  2. Optionally, to view detailed information about the Web Page, click the Web Page tab in the Tool Ribbon. The Item Details screen is displayed, showing who created the item, who modified it last, and what the last actions taken on the item were. The direct link URL to the Web Page is available here, which can be copied to the clipboard using the "Copy Link" icon. This can be used to easily share and also open the Web Page in a browser. On this screen, click "Related Items" in the Function Menu to see other items in the system that reference or utilize this Web Page. When finished, click the Edit tab in the Tool Ribbon to return to the main edit screen.

  3. Optionally, to assign Metadata values to your Web Page, click Edit > Set Metadata in the Tool Ribbon. The Metadata pop-up window is displayed, listing every Metadata field defined for this account. Enter or select the desired Metadata values, then click ok (see Metadata Settings for more details on how to set up Metadata fields).

  4. Optionally, you can assign one or more tags to your Web Page. To assign a tag, click on the "Add tag" field in the Edit > Tags section of the Tool Ribbon. The system displays a pop-up menu of all the existing tags. You can select one of these tags, or type in a new one and press Enter. You can repeat this process to add more tags. To remove a tag, click the "X" icon next to the tag label.  

  5. Optionally, to rename the Web Page, click Edit > Rename. A "Rename Item" dialog box is displayed. Enter a new name for the Web Page, then click save new name.

  6. Make any necessary configuration changes to the existing Web Page and / or to the content of the Web Page.

  7. In the Tool Ribbon, click Edit > Save .

If you haven't yet published this Web Page, the next step is to publish the page. See "Publishing a Web Page" above for more details on this process.

If you've previously published this Web Page, you need to run the "Pick Up Changes" process in order to publish the changes. See "Pick Up Changes" below for more details on this process.  


 Pick Up Changes in a Web Page

Click hereClick here

If you make changes to a previously published Web Page, you must run the "Pick Up Changes" process in order to publish those changes and make them accessible to customers. To run Pick Up Changes on a Web Page:

  1. Search for the desired Web Page (see Search for an Item for more details on the available search methods).

  2. Click on the Web Page name. The Web Page screen is displayed and populated with the details of the selected Web Page.

  3. In the Functional Menu, click "Publishing." The Publish screen is displayed.

  4. In the Tool Ribbon, click Publish > Pick Up Changes. A warning dialog is displayed. Click ok.

  5. The Publish screen is refreshed to show details of the publishing process. Click the refresh button (double-blue arrow icon) to see the latest information. The "Changes" section of the screen is updated to show the details of the changes (username, date / time stamp, etc.).

Note:  If you're using the "Maximum submission" counters for this Web Page, running Pick Up Changes will reset all counters back to "0."


 Delete a Web Page

Click hereClick here

To delete an item:

  1. Search for the desired item (see Search for an Item for more details).

  2. Click on the item name. The main item screen is displayed and populated with the details of the selected item.

  3. In the Tool Ribbon, click Edit > Delete. A confirmation dialog box is displayed.

  4. Click delete item to confirm the deletion.

Foldered items are moved to the Recycle Bin. Non-foldered items are permanently deleted.


 Append Google Analytics

Click hereClick here 

Messaging integrates with Google Analytics -- a free service offered by Google that provides website tracking, reporting, and insights into your customers. Reports from Google Analytics are then made available from within the Messaging platform, to help you review the performance of your Campaign or Web Page. Before you can begin using Google Analytics, you must complete the onboarding steps -- please see Google Analytics Setup for more details on that process.

In order for Google Analytics to parse out customer activity from a particular Campaign or Web Page, you must configure certain query string parameters in the links that are included in the content. To define these query string parameters:

  1. In the Tool Ribbon, click Append Google Analytics. A new "Google Analytics Tracking" section is displayed within the "Responses" section. This new section displays the Google parameters.

  2. For each Google parameter, enter the desired value for this Campaign.

Note: The Google tracking parameters will be automatically appended to all tracked URLs in your Campaign or Web Page; they will not be appended to URLs if sending Proofs.


 Change Web Page Status

Click hereClick here

Suspend a Web Page

Suspending a published Web Page cause the system to stop generating any dynamic content or personalization contained within the Page content. The page will still be accessible to consumers.

To suspend a Web Page:

  1. In the Functional Menu, click "Publishing." The Publish screen is displayed.

  2. In the Tool Ribbon, click Publish >  Suspend Web Page. A confirmation dialog box is displayed. Click ok. The system changes the status of the Web Page to "Suspended."

Resume a Web Page

To resume a suspended Web Page:

  1. In the Functional Menu, click "Publishing." The Publish screen is displayed.

  2. In the Tool Ribbon, click Publish > Resume Web Page. A confirmation dialog box is displayed. Click ok. The system changes the status of the Web Page to "Running."

Stop a Web Page

Stopping a published Web Page will cause the system to stop generating any dynamic content or personalization contained within the Page content. The page will still be accessible to consumers, and will continue to collect metrics for reporting purposes.

To stop a Web Page:

  1. In the Functional Menu, click "Publishing." The Publish screen is displayed.

  2. In the Tool Ribbon, click Publish > Stop Web Page. A confirmation dialog box is displayed. Click ok. The system changes the status of the Web Page to "Done."

Cancel a Web Page

Canceling a published Web Page will cause the system to stop generating any dynamic content or personalization contained within the Page content. The page will still be accessible to consumers, but the system will no longer collect metrics for reporting purposes.

To cancel a Web Page:

  1. In the Functional Menu, click "Publishing." The Publish screen is displayed.

  2. In the Tool Ribbon, click Publish > Cancel Web Page. A confirmation dialog box is displayed. Click ok. The system changes the status of the Web Page to "Canceled."